The 23 zone defense is a classic zone defense formation in basketball. While it is one of the oldest and seemingly most rudimentary zone defenses in basketball, it can be very effective when used properly. You’ll encounter elements of the 23 zone at all levels of the sport.
I’m gonna take you through the full run of the 23 zone defense here with a deep focus on how exactly it’s intended to work. By the end you should feel confident introducing the 2-3 zone to your players and working the technique into your rotation. You should also have a clear idea of whether the 2-3 zone is a fit for your team and your objectives, and when you might want to deploy it.
Towards the end we’ll take a look at the origins and evolution of the 23 zone and dive into some of its most prominent and successful applications. And finally, we’ll leave you with some materials to aid in implementation.
Without further ado, let’s get after it.
Implementation of the 23 Zone Defense
You can imagine that, if you were to just start thinking about how to setup a basketball defense, you would land on something like a 23 zone as one of your first concepts.
The 23 zone defense is one of the most natural defensive formations in basketball, as it presents an evenly distributed barrier around the goal. Your crew is split into two lines of defense, one around the top of the key and another under the basket.
Initial Formation
In a typical 23 zone defense, your two guards line up at the top of the key, with the remaining three players forming a line in front of the basket. 2 players in the front and 3 in the back. The ‘23’ formation.
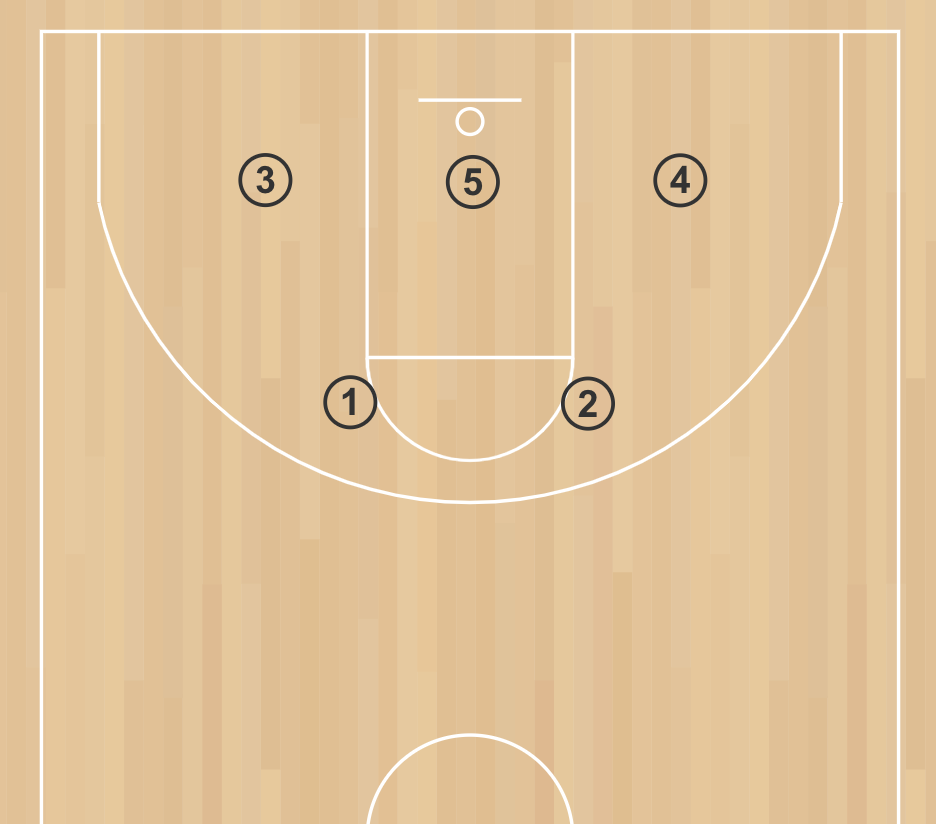
Note that this can appear almost indistinguishable from a 2-1-2 zone. The names are often used interchangeably, but there are slight differences. The 212 zone indicates a center playing slightly further forward.
This 2-1-2 positioning can often occur naturally in a 23 zone. Slight adjustments to the 23 as it develops around the unique qualities of your team may well end up dictating what label and subtle strategic variations you elect to apply here.
Player Roles
This formation operates symmetrically, so the outside defenders on either side of the court will have similar roles. Guards operate in conjunction out front. The wing players work the inside and the corners.
Guards
At the top of the key, the guards are working together to close down the passing lanes and blocking perimeter shots from the opposing team’s guards. The guards need to communicate and work together fluidly to greet the opposing offense, pressure them away from scoring zones and force mistakes.
If an on-ball defender is closed out and pressuring the ball handler, the opposite defender should maintain awareness of passing angles and incoming screens. A successful pass to the opposite side should trigger a smooth rotation in duties.
Center
The center is the anchor. Their main responsibility is to protect the rim, deterring shots taken near the basket and scooping up rebounds. Considering that this positioning places them under the basket, make sure you’re clear on the defensive rules for your league. In most leagues, there is some restriction on camping out in the pain without actively guarding an attacker, and this formation encourages that.
As an offense attacks into the paint, the center should close out, assisting other defenders and deterring close range shots. But this will put your center at the mercy of those wing guards, so communication along the back line is as crucial as the front.
The Wings
Your wing players, typically your 2 forwards, will cover the corners. If the ball goes to either corner, they need to confront the handler and lay pressure against easy shots or penetration. In many ways, this makes the wing positions the most challenging.
Quick ball movement from the top of the arc can put the wing defender in a position where they’re responsible for a large swath of land. Not only is the wing responsible for corner perimeter shots and baseline drives, but when if a guard loses their man, the wing is expected to close out until they can recover.
Rotations
At higher levels, the 23 zone defense is particularly dependent upon clean rotations. While this strategy can be useful as an introductory strategy in a youth league with minimal outside shooting, it can become more challenging as the court spreads out.
The three defenders on the baseline need to slide to cover cuts or passes. The two defenders up front must also rotate to challenge outside shooting, cover the passing lanes and slow down any offensive players as they move through the middle of the court.
Ball on the wing
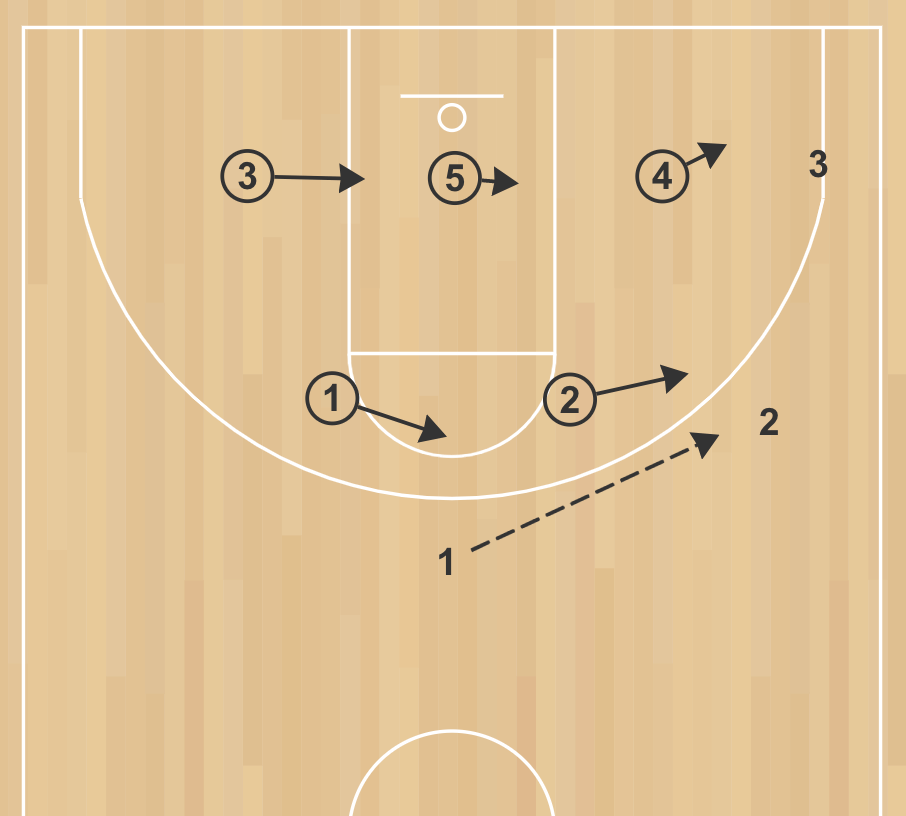
As the ball handler passes or moves to one side of the perimeter, the formation shifts in that direction.
Here the offense sends the ball off to the right side. Defender 1 shifts right to discourage passing while defender 2 closes out on the ball.
The back line also shifts slightly to the right. Defender 4 sets up on the corner which is now in passing distance. the center shifts slightly close up the gap and get between the ball and the basket.
The offense is probably not going to shift to that opposite corner with anything but a long, slow lob. This means that defender 3 isn’t as worried about the corner as they are about cutters. They’re free to shift towards the paint to fill the gap left by 5 and set up against penetration.
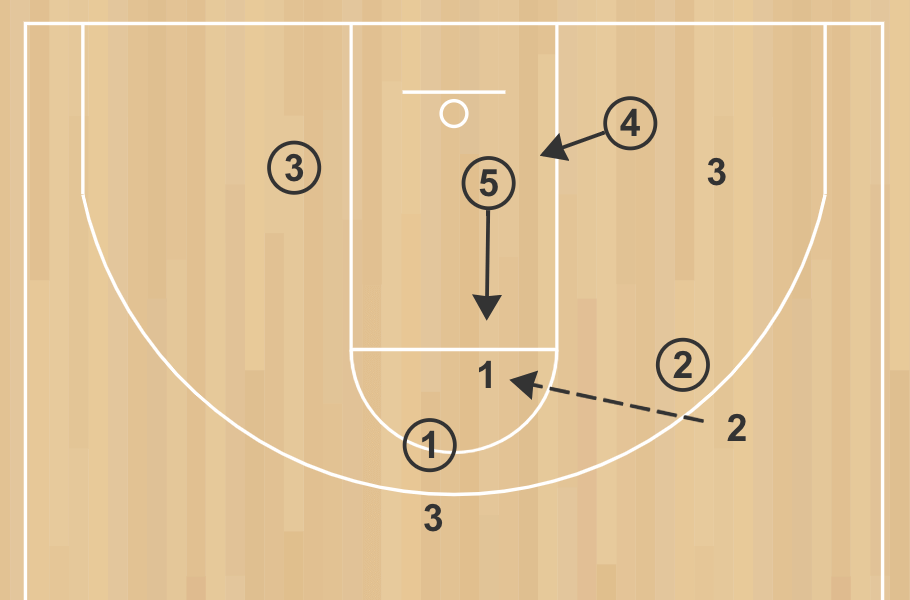
Ball in the corner
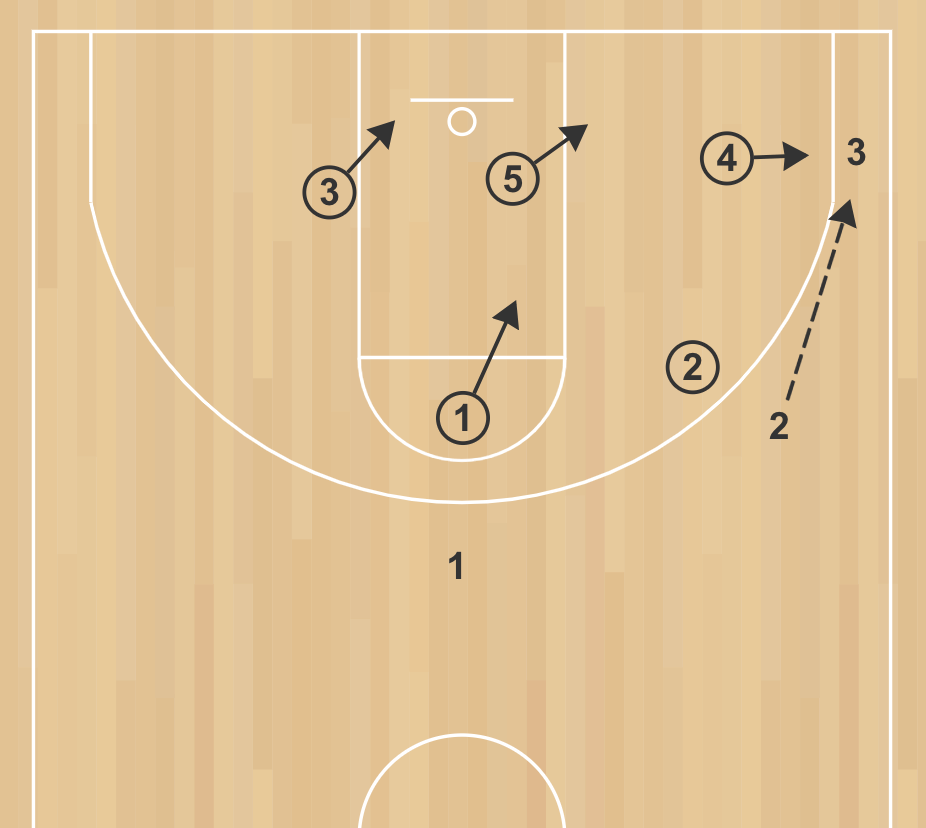
Now, if that wing sends the ball down into the corner, the formation shifts further towards the ball. The nearest defender should move to close out, expecting a corner shot or a baseline drive.
But the remaining rear defenders should shift towards inwards and towards the baseline as well. A good rule of thumb for these defenders, 3 and 5 in this case, is to always keep the ball in front of them on the floor.
With the guards, you can see that 2 is still pretty well positioned to guard against interior passing. But that opposite side defender should drop into the paint.
If a long pass is completed across the court, your defenders may have a longer closeout. They should have some time to execute as the ball is traveling, but you need some communication and a solid plan here to make sure you don’t get caught up.
If the guard gets beat, and they can’t recover to their zone, the wing should take over until they can get back. It’s up to the guard now to call out when they’re in range so that the additional defender can drop back to their zone. This action is often called ‘bumping’. The guard will even sometimes say the word ‘bump’ or ‘switch’ or whatever as an indication to the forward that it’s safe to drop back.
Into the high post
Ideally, you wouldn’t find yourself in this position, but it will happen, so you should be prepared.
Let’s say a pass is completed into the high post from the top or the wing. The center should close out while the back line defenders close up the resulting gaps.
In practice, the opposite side defender can usually camp out while the ball-side defender slides into the center’ was keeping warm’s spot.
Now, if an offense starts to make quick work of your 23 zone, you’ll want to throw some wrinkles in your plan to throw them off. Brandon Shields shares a bunch of great adjustments over here.
When to use a 23 Zone Defense
If you work at it, and if your team is well suited to it, a 2-3 zone can be effective in a wide range of scenarios. There are certainly high-level coaches out there who have used this strategy as the backbone to their entire defensive set.
One reason to turn to a 23 zone is if your opponent is punishing you in the paint. This won’t always work, because this formation does still leave some space in the arc, but it should serve to encourage outside shooting over dribble penetration.
The 23 zone can also be a good way to introduce a young team to defensive strategy. There’s a logic to this formation and its rotations that make it fairly easy to grasp. A team that’s only just beginning to wrap their minds around defensive strategy and synchronized movements can benefit from the simplicity of the 23 zone.
I would caution against leaning on this one in a youth league though. All it takes is a slight height advantage (not uncommon in the lower ranks) and the opposing team ends up getting discouraged while your team isn’t really learning much. If you’re coaching kids, let’s make sure they’re having fun.
Here are some specific strengths and weaknesses…
Advantages
- The 23 zone defense can help slow down a team’s offensive flow in the paint without exhausting your players.
- As it consolidates defense within the arc, the 23 zone can decimate a team with weak outside shooting.
- With all of your defenders clustered around the paint, you’ve got good positioning for rebounds.
- The 23 zone defense can make a double-team more manageable as it allows spacing to collapse. Defenders will theoretically have less ground to cover if a double team is broken.
Disadvantages
- It can leave defenders vulnerable to backdoor cuts and open perimeter shots.
- Defenders can get confused easily if the offense is able to spread the floor and move the ball quickly.
- The 23 zone defense can be difficult to keep up with for players who lack the agility or speed of thought and movement.
How to Attack a 23 Zone
Attack the gaps. The forwards and guards are stretched across the perimeter, leaving weak zones between them. Charge those gaps can encourage a double-team. This will stretch those gaps further. A well-threaded pass through this type of coverage can get the ball into a wide opened lane.
Instruct your offensive players to drive into those gaps and pass. They don’t need to pass inwards at first. You can test the waters. Watch how the zone responds and look for patterns, then kick the ball back out to the perimeter.
The high post is considered a distinct weakness of the 23 zone and most coaches should know well to attack it. Penetrate beyond those two guards and you can often get up some easy shots near the free throw line.
You can also throw some screens at the top of the key to disrupt those front line defenders. Take a look at the horns set for an offense that strongly emphasizes the types of screen plays that can open up massive gaps in a 23 zone.
History of the 23 Zone Defense
The 23 zone defense originated in 1914 when Eli Camden “Cam” Henderson implemented it in his Bristol High School team against Grafton YMCA. Slippery gym conditions and a need for a better defense against fast breaks triggered its invention.
Henderson successfully used this style of basketball at Davis & Elkins College and later at Marshall University in 1938, when the team beat Long Island University’s 40-game winning streak. In 1947, Henderson led Marshall to a NAIA championship title with his 2–3 zone defense and fast break offense.
In 2003, Syracuse University coach Jim Boeheim led his team to an NCAA tournament championship with his 23 zone as a cornerstone of their defense.
23 Zone Defense Drills
Four-Man Weave Drill: This drill requires four players. Two players start at the baseline and pass the ball to the opposite end of the court. The other two players start on the opposite end and pass the ball back. As they move down the court, the players should be talking and communicating which player is in the zone and which player is outside the zone.
Zone Rebounding Drill: Space players evenly around the perimeter. Assign them each a number. Place 2 defenders under the basket. Shoot the ball and call out 2 numbers. Those are the players that the 2 defenders must box out.
Defensive Rebounding Drill: Setup an offensive player and a defensive player on either side of the basket. Shoot and let the defenders practice boxing out while offensive players try to score. When a defender gets the rebound, they switch places with the shooter. When the offense scores, they become the defense.