When it comes to defensive strategy in basketball, few formations have the staying power of the 1-2-2 zone defense. Used at all levels of the game, the 1-2-2 zone is an integral part of any defensive playbook. But what is the 1-2-2 zone defense, and how does it work? In this blog post, we’ll explore the fundamentals of the 1-2-2 zone defense, as well as its history and applications.
No matter your team’s objectives or skill level, the 1-2-2 zone defense can be an effective tool in your defensive arsenal. To maximize its potential, you must first understand the basics of the formation, how to implement it on the court, and how to adjust it to suit your team’s needs.
Keep in mind that this formation is often extended to a press during crunch time. Strategy is quite similar, but the defenders become more aggressive across the length of the court. To examine the press in more detail, take a look at my breakdown of the 1-2-2 press.
In this blog post, we’ll break down the 1-2-2 zone defense, including its origins and application, as well as provide you with the resources you need to successfully introduce it to your players. By the end, you’ll have a better idea of how to use the 1-2-2 zone defense to your team’s advantage.
Let’s get to it!
Implementing the 1-2-2 Zone Defense
The Initial Formation
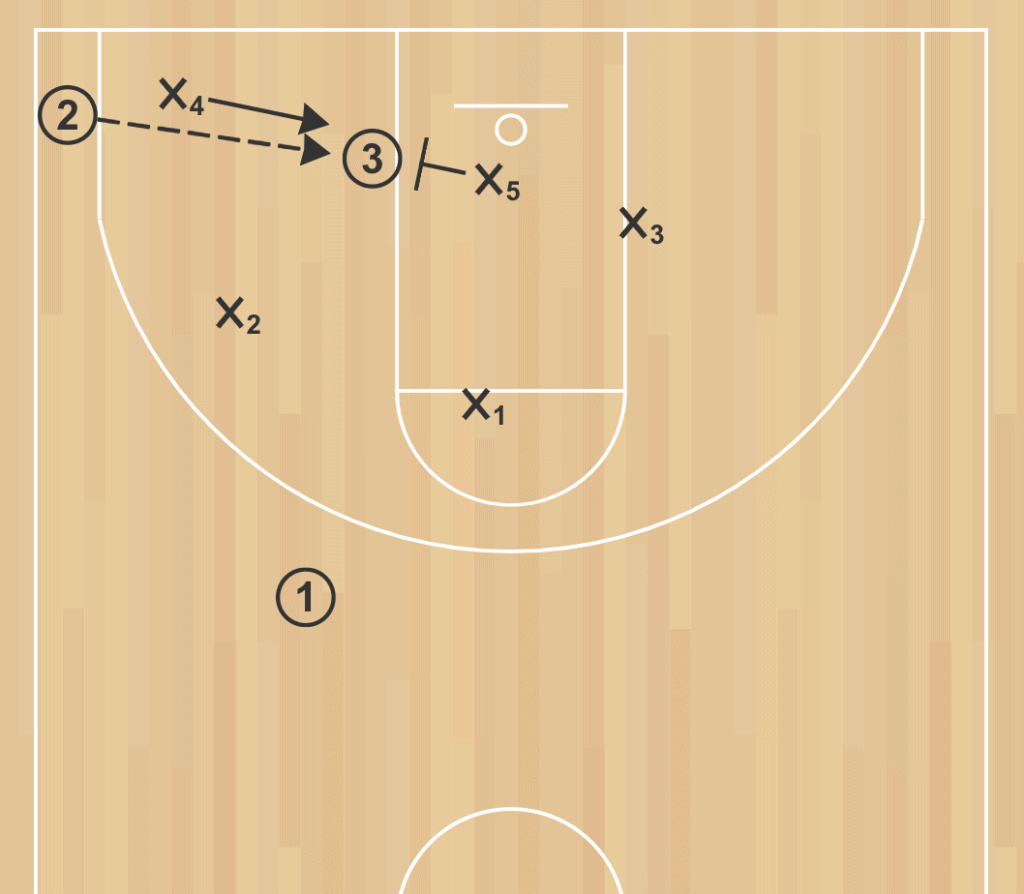
The basic formation of the 1-2-2 zone places 1 defender near the top of the arc, 2 more spaced at the top of the key, and 2 more on either side of the basket.
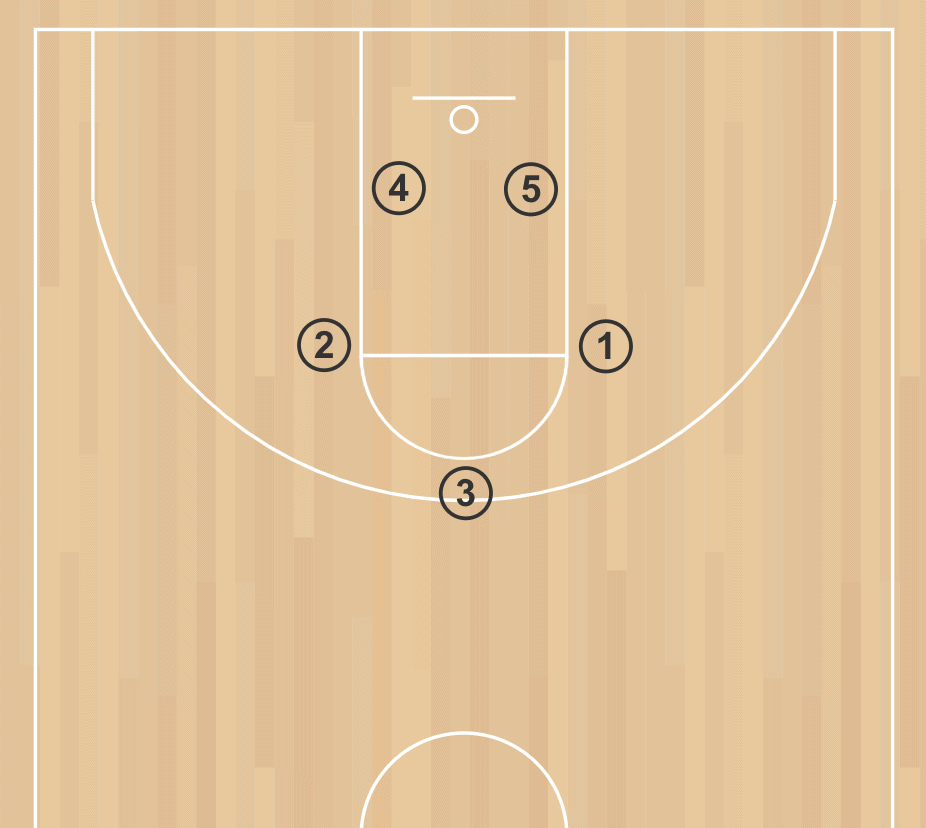
You’re probably going to put your bigs under the basket, but the front triangle is a little more flexible. The tip of the triangle is going to be covering the most distance, so putting your quickest player out front kinda just makes sense. But they’re also running the show, so communication and court presence are equally important.
Roles in the 1-2-2 Zone Defense
The 1-2-2 zone can be divided into 3 lines of defense. You have a top defender who greets the oncoming ball handler, steering them into increasing pressure and backup from the second line of defense. The post players guard the paint.
Top Defender
The top defender plays the top of the key. The key mindset here is to force the offense to pick a side. Keep opposing players out of the high post position and discourage driving down the middle. As the ball moves to either side, the wing defenders will adjust and often leave the top defender alone to guard the high post.
Wing Defenders
As the top defender pressures the ball to either side of the court, the corresponding wing picks it up as the on-ball defender. The opposite wing then monitors the resulting passing lanes. If the ball makes it out to a corner, the wing on that side can drop down to double-team with the post player on that side.
Post Defenders
The posts guard the basket and the paint. With the wings and the top defender focused on directing traffic at the top of the paint, these 2 post defenders are left to deny internal attempts. As the ball shifts to either side of the court, one post can stick to the basket, while the other jumps out to pressure the ball handler.
If your posts and wings are quick and coordinated, trapping at the corner is a strong possibility. Get 2 defenders out for the trap while the opposite defenders patrol the paint and cross-court passes.
1-2-2 Zone Rotations
As with any zone, the rotations are key. Yeah, this strategy is based on a static formation to start, but a zone defense that doesn’t move effectively against the ball is not going to be effective. Let’s take a look at how the 1-2-2 zone defense can flex under pressure.
Ball on the Wing
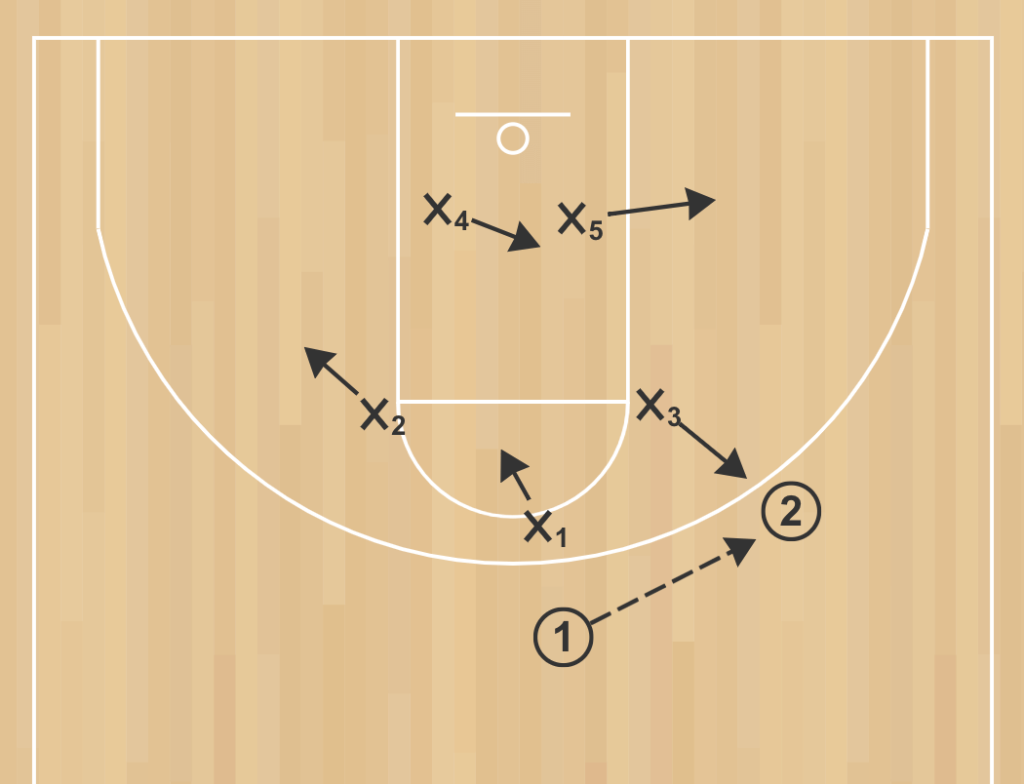
The ball-side wing defender needs to close out quickly and take over from the top defender as the ball moves to their side, freeing up the top defender is now freed up to drop to the high post.
The weak-side wing drops below the ball to position for help in the paint or to deny passing to the opposite side.
The ball-side post slides further to the ball-side, prepared to n the event of a pass to the corner. The weak-side post lines up under the basket to guard the depths of the paint.
Ball in the Corner

The ball-side post needs to close out here, jumping to deny corner shooting. The opposite post shifts a little further to that side to set up for a baseline drive or a long pass. But they need to be particularly wary now of cutters and passing into the paint.
The big question here is what the strong-side wing wants to do. They can choose to drop towards the paint to guard against cutters and inside passing. But this opens up a pass back to the wing. They can also choose to deny that pass back out to the wing, pressuring the ball handler to take action.
Or, they can spring the trap, closing out on the corner in a double-team with the strong-side post. This can leave a gap for the offense to exploit, but if the trap is successful, the rewards are high.
Ball in the High Post
The high post is a weak point in the 1-2-2 zone defense. This means that your team should be cautious about allowing the ball to get into this position. But nobody’s perfect, so let’s plan for failure.
If the ball makes it into the high post, one of the post defenders should close out. Unless your formation has been stretched, it may be up to you to decide which defender jumps up, giving you a slight advantage if you send your quicker, faster player. It’s worth it to make sure your post players are clear on who this would be.
The top defender can apply some pressure from behind if possible. Keep in mind that, depending on the shooting proficiency of your opponent, it may be better to force a 2-point attempt than to allow a pass back out for an open 3.
Wings should stick to covering their matchups here. But they should be aware that the offense will probably be looking to send cutters in close.
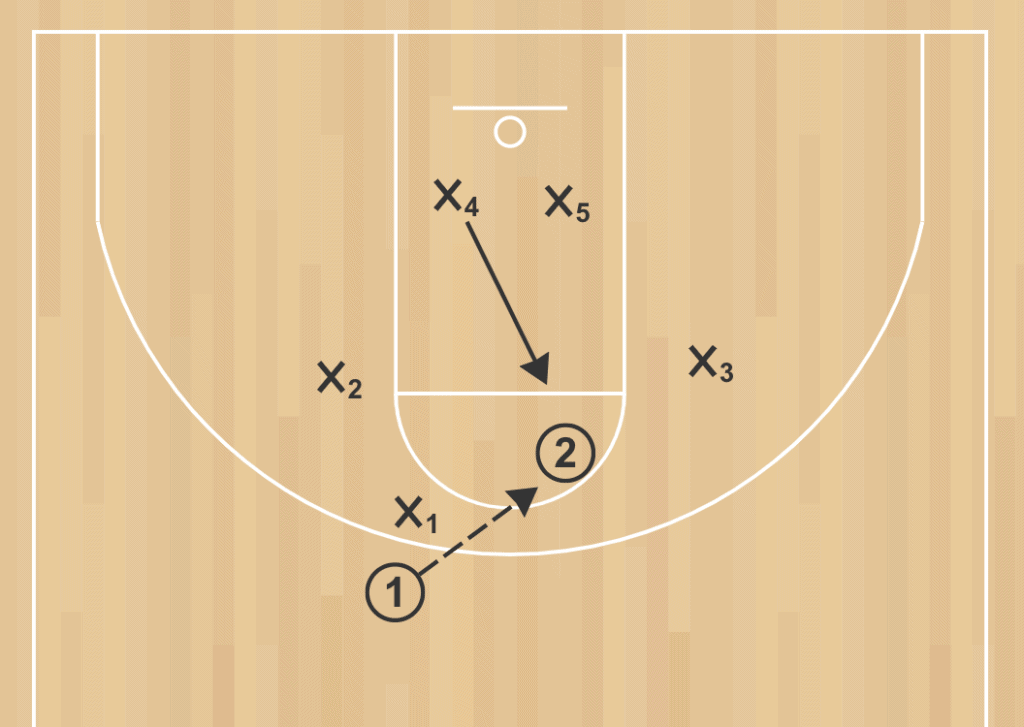
Ball in the Low Post
There shouldn’t be a lot of opportunities for the offense to hang out in the low post. You’ve got 2 defenders patrolling to discourage this. More often than not, this positioning will come from a pass from the corner.
When this does occur, the strong-side post is probably on the weak side of the ball. They should close out behind the ball handler, digging hard at the ball while the alternate post player gets in front of and denies shooting attempts.
The weak-side wing drops to cover the key. The strong-side wing denies passing back out to the offensive wing. The top defender sticks to the high post.
The ball needs to turnover here, whether it’s off a score, a steal or a rebound.
Trapping in the 1-2-2 Zone Defense
The 1-2-2 zone has a natural tendency towards generating trapping opportunities. You’ll want to be well aware of these opportunities so that you can capitalize on them to generate turnovers.
The Corner Trap
This will always be one of the best spots to drop a trap. In addition to your defenders, you have the hard angle of the sidelines to back you up. If your strong-side post is locked in on the ball, their buddy on the wing should know what’s up.
If the wing can safely jump to the double-team without giving up a clear pass, this is going to create one of the most effective traps available. You can find yourself with 2 defenders here, pressed up against the ball handler who now has very limited options for escape.
The Wing Trap
The basic structure of the 1-2-2 zone, with a top defender diverting the offense to either side of the court, is an excellent trapping setup on its own. If your wing defenders are practiced, they can spot the right moment to jump into a double-team with the top defender, shutting down options for forward ball movement.
Ideally you want to trap closer to half court, or down in the corners. These zones just present more effective barriers. But we can still salvage a trap here in the half court, given the right conditions.
As soon as offensive wing receives a pass, the top defender and the strong-side wing sprint to close out together. Meanwhile, your remaining defenders need to be digging deep to prevent passing opportunities. Without this pass defense support, this can be an easy trap to break.
This tends to work best when the ball has just been passed out of the corner. You want the element of surprise on your side. If you try this enough times, the offense will be well aware and ready to break out and take immediate advantage of your weakened spacing.
Trapping at the Top
Possibly the most difficult trap out of the 1-2-2 zone, but if you need a turnover and your team is capable, this can be a slick move.
As the top defender steers the ball handler to one side, the strong-side wing sprints into the double-team. But the key here is that simultaneously, the strong-side post defender needs to sprint out to cut off a pass to the wing. If that wing is opened, it’s way too easy to get a pass off and cut right into the open space left by that wing defender.
When to Apply a 1-2-2 Zone Defense
The 1-2-2 works well against an offense that is reliant on the 3 point line. The defender at the peak can close out on 3 point attempts. The other 3 defenders are also positioned to help close out on shooters, as long as they maintain their spacing and positioning.
This formation is also helpful for rebounding. With the players spaced out, it’s easy to track down any rebounds and quickly pass the ball out to a teammate. This gives the team a chance to transition quickly into offense.
Advantages of the 1-2-2 Zone
- The 1-2-2 zone defense can be very disruptive when trapping is successful, forcing turnovers.
- This defense can shut down the opposing team’s best players, as it allows for double-teams and crowding.
- The 1-2-2 can also be used to limit the passing lanes, making it difficult for the offense to move the ball effectively.
Disadvantages of the 1-2-2 Zone
- The high post can be left vulnerable in the 1-2-2 zone. If your top defender isn’t adept at shutting down shooting, a strong mid-range shooter can disable a 1-2-2.
- Because the 1-2-2 zone spreads post play over a large swath of land. A slow or inexperienced post player can end up leaving you open to corner shooting and deep drives.
- Rebounding can be a challenge because roles are shared in the paint. If your post players aren’t synchronized you end up with a lot of confusion and missed boards.
Origins of the 1-2-2 Zone Defense
The 1-2-2 zone defense is one of the older defensive strategies in basketball. It’s very similar to a 3-2 zone with just a few added strategic goals. From this zone, it’s easy to see the evolution into strategies like the viking press or the Villanova 1-2-2.
The 1-2-2 zone is such a dynamic defense is still used today by many college and professional teams.
1-2-2 Zone Defense Drills
2-on-2 Zone Fronting: This drill works on teaching players to front their opponents in the post and deny them the ball. Two offensive players stand on the block, with two defenders in the middle of the paint. The defenders must front the offensive players, using their hands and feet to stay between the ball and their opponents.
2-on-2 Zone Pass Denial: This drill is designed to help defenders work on their ability to read the offensive players and deny their passes. Two offensive players stand at the top of the key, and two defenders line up on the wings. The defenders must stay between their opponents and the ball, while still being in position to cut off any passes.
2-on-2 Zone Closeouts: This drill is designed to help defenders work on their ability to close out on their opponents quickly. Two offensive players stand at the top of the key, and two defenders line up at the foul line. The defenders must sprint out to their opponents and close out on them quickly, making sure to stay between their opponents and the ball.