What is the 1-3-1 Zone Defense?
The 1-3-1 Zone defense is a strategy of defense employed in basketball. A line of 3 defenders is stretched across the 3-point arc, lined up with the free throw line. The remaining defenders are placed in front of and behind this line. This is very similar and sometimes deeply entwined with the 1-3-1 press defense.
Real quick, before we get started… While defensive basketball concepts can seem straightforward, you can get lost in the weeds here very quickly. If needed, you can catch up on the basic vocabulary here before you continue.
As usual, we’ll start with a quick breakdown. For those who are interested in a comprehensive overview, we’ll try and dive progressively deeper into the murky waters of basketball theory.
What does the 1-3-1 Zone Look Like?
The 1-3-1 Zone Initial Formation
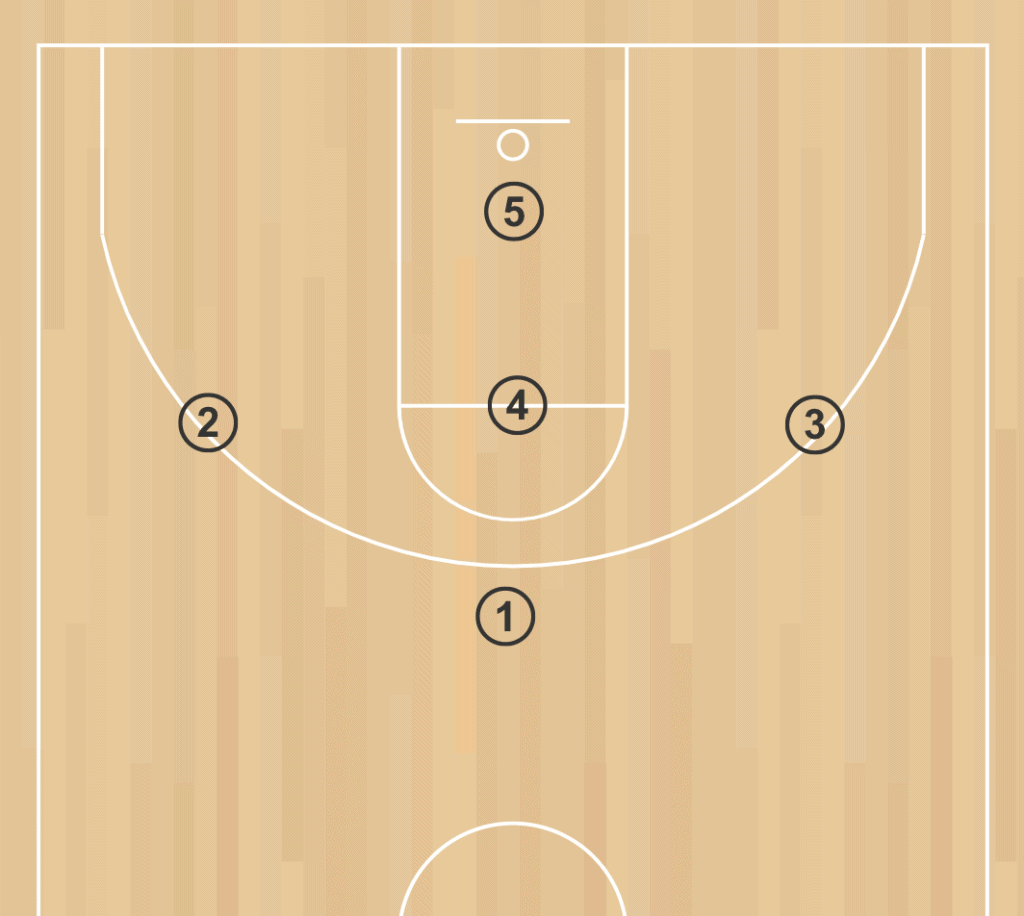
Particularly when discussing strategies of zone defense, it’s helpful to discuss the initial formation, where we want players to be positioned on the court when approaching a style of defense.
With the 1-3-1 Zone, you want to place your first defender at the peak of the arc. Just behind them, around free throw distance, are 3 more defenders, evenly spaced across the arc. The final defender hovers beneath the basket.
Here’s what it looks like…
1-3-1 Defensive Roles
The roles in this defense are frequently labeled. That’s why you see 2 title on every role here except for the wings. Pick the names that work best for you. Maybe someday we can all settle on something that works for everyone. Personally, my vote is Point, Middle, Goalie.
Point or Chaser
This is the first defender the offense encounters. The Point guides the ball handler towards the sidelines. You probably want a player with a big motor here because this position can be draining.
Center or Middle
Behind the Point, at the center of the diamond, you’ve got your bouncer, the Middle. This player is responsible for clogging up that middle line and kicking fools out if need be. I’ve heard many coaches describe the Middle game as ‘King of the Hill’. If a pass is completed in the paint, you’ve lost your round.
Wings
The wings to either side of the middle position. They need to work together with the Point to trap on the sidelines, while still keeping an eye out to shut down passing opportunities. If a low pass along the sidelines gets through a wing, they need to be better. A high lob is fine.
Warrior or Goalie
One player hangs back on the basket, the final defender on the goal. You’re probably splitting your fastest and tallest players between the goalie and the point in this formation. Some coaches prefer a lengthier player out in front to help disrupt passes. Other coaches prefer to send a quicker player out front to hound the offense. A fast player in the goalie spot might give up shots to taller players, but they will be able to quickly recover to the opposite side of the court in the event of a turnover.
1-3-1 Zone Rotations
Understanding that this zone is geared towards disrupting passing lanes should help clarify rotations. As the ball moves, your formation shifts to block passing lanes as opposed to managing direct matchups.
The Point diverts the ball to either side of the court. Wings deter low passing down the sidelines. A direct drive down the center will be met by multiple defenders. As long as the Point and the middle clog up the paint effectively, a direct charge will be uninviting.
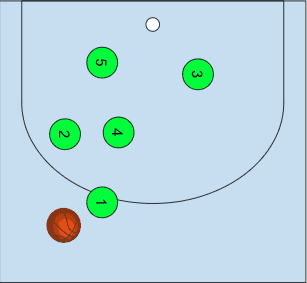
Ball on Wing
The Point guides the ball handler to the sideline, passing them off to the ball-side wing who closes in to meet them. The middle defender moves to the strong corner, cutting off passing into or across the paint. The weak-side wing drops into the middle and the goalie slides over to the strong corner.
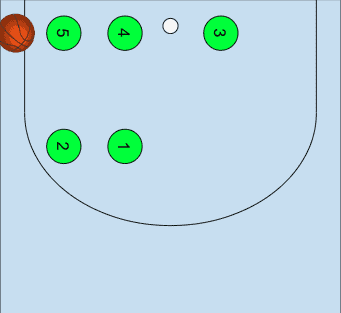
Ball in the Corners
One of the goals of this formation is to encourage high passes to these unguarded corners. These slow floaters should give you time to drop into a more favorable setup for the corners.
The Point settles around the strong corner. The goalie closes out on the ball handler with the middle backing them up closer to the basket. The strong-side wing hangs out, denying backwards passing. And the weak-side wing drops to the baseline.
1-3-1 Zone Defense Theory
This is a borderline whacky setup. It’s a unique style and can serve to push an offense into formations that they’re not comfortable or experienced with.
Cutting off passing lanes should mean that the opposing players are forced to run more high, slow passes.
With the right energy and practice, you should be able to manage the corner gaps that this formation creates.
When to use the 1-3-1 Zone Defense?
The 1-3-1 Zone can be very disruptive, much like it’s expanded press defense.
A well orchestrated 1-3-1 zone has certainly served faithfully at all levels of play. It just might not always be the best match depending on the offense or the occasion.
How to Beat a 1-3-1 Zone Defense
There are several features of this defensive formation that we can take advantage of.
This defense can be exhausting to run long term. Even with a very well-conditioned crew, you’re likely to make heavy use of your bench with this defense.
But the true kryptonite of this formation would be the corners. It leaves the corners completely unguarded in its static state. Now, if the defense is quick and intuitive enough, this is much less of an issue, as they should be able to adjust to ball movement. But if the defense is not quick enough, a high pass to the corner is an easy scoring opportunity.
This can be a tough defense to learn and teach. But it is a fun defense, meaning that even inexperienced players can find it really engaging.
For a nuts and bolts play that takes specific advantage of this defensive setups, checkout Sean Miller’s solution.
The History of the 1-3-1 Zone Defense
The origin of the zone defense
Coach Red Sarachek. Bernard “Red” Sarachek coached basketball at Yeshiva University in New York City from 1940-1969. He mentored a number of well-known coaches, including William “Red” Holzman who led the Knicks from 1967-1982.
Sarachek is credited with the invention of the 1-3-1 half-court zone defense. Sarachek was known to constantly evolve and experiment with strategies and configurations and was the likely origin of a number of interesting basketball strategies.
Coach John Beilein is also a known proponent of the 1-3-1 and deployed this defense widely in his time at Virginia. While he’s developed a reputation for running the 1-3-1, he’s since shifted away from this type of coverage, understandably professing a need to evolve with the game and your players.
How to Teach the 1-3-1 Zone
It depends on the level you’re working at. With younger players, you may not get beyond directing them to a certain region of the court. As your teams collective IQ slides up, you can incorporate a more complete explanation of the concepts that drive this strategy.
I have come across a few resources over the years that can really help players internalize this strategy. I particularly recommend this description from Coach Freddie Owens. The video is a little long, but he does an excellent job pulling this strategy out of concept and into reality.
Drills to try
It’s generally recommended to nail down some basic man-to-man defensive skills before zooming in on a strategy. This is just the type of widely practical stuff that can apply in a multitude of situations. There are a ton of great defensive drills out there to experiment with.
What are Some Similar Defensive Strategies to the 1-3-1 Zone?
The 1-3-1 half-court zone is most similar to the 1-3-1 press. This isn’t typically the case where a half-court strategy is related to it’s press variation. Often the goals and rotations are significantly different. In this case, the half-court zone does have roughly the same rotations, and can result in traps that are similar to the press extension.
The 1-3-1 also bares some resemblance to the classic 2-3 zone in that it often rotates into this formation and can display similar qualities as it does.